API Usage
Each project comes with it's own API automatically attached to it. External applications can access your project's ressources like workshop modules, AI models and datasets after you created an API key for them.
Create an API key
To create an api key, head over to your project overview via the file icon in the sidebar.

Click the Manage API keys button to get to the API key management interface.
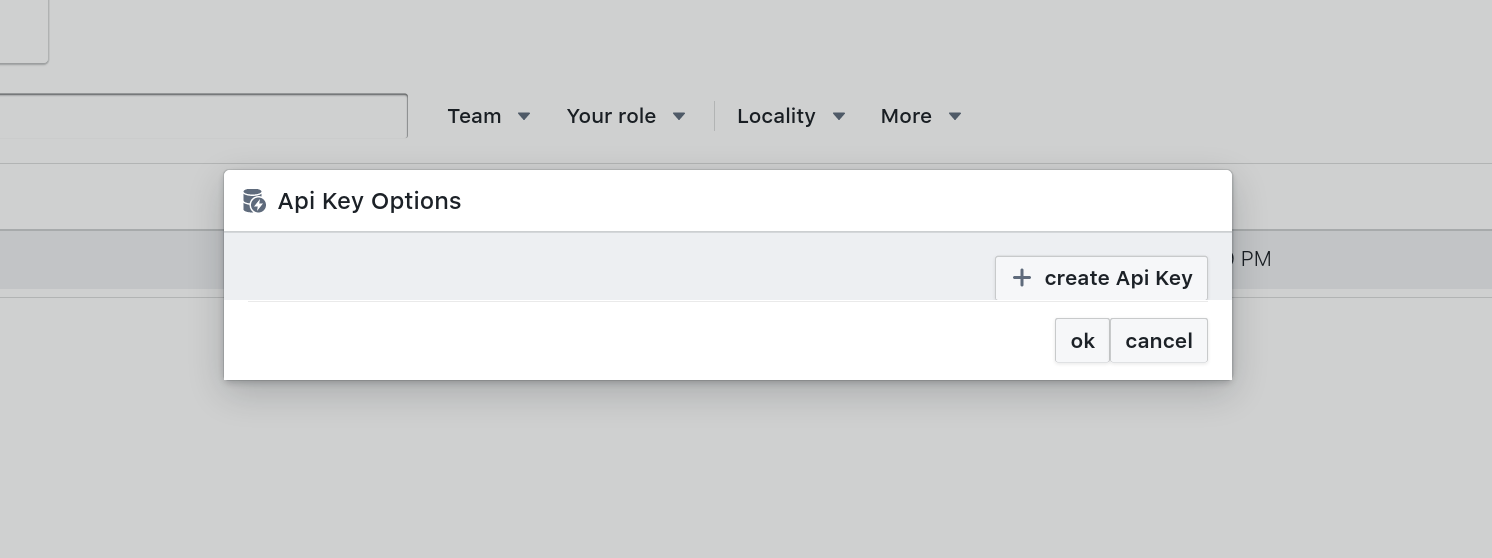
Initially your keys will be empty. Go ahead and create a new api key by clicking the create API key button.
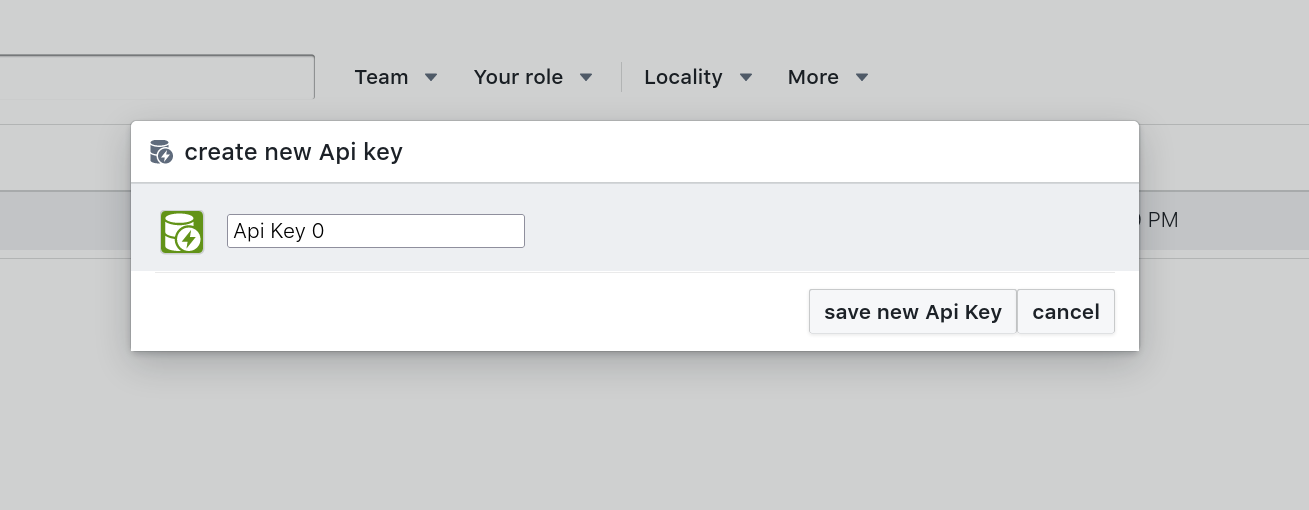
You can optionally rename your key by typing in the text field and change the icon and coloring for categorizing your keys in a visual way. To change the icon or coloring click the icon left to the text field.
To save your newly created key, hit the save new API key button.
To not save your key just hit the cancel button.
Your newly generated key is now displayed to you. You should write it down to a safe place, it is the only time it is visible to you. However, if you lose access to the key, you can always regenerate it. You can use the copy button to copy the key to your clipboard.
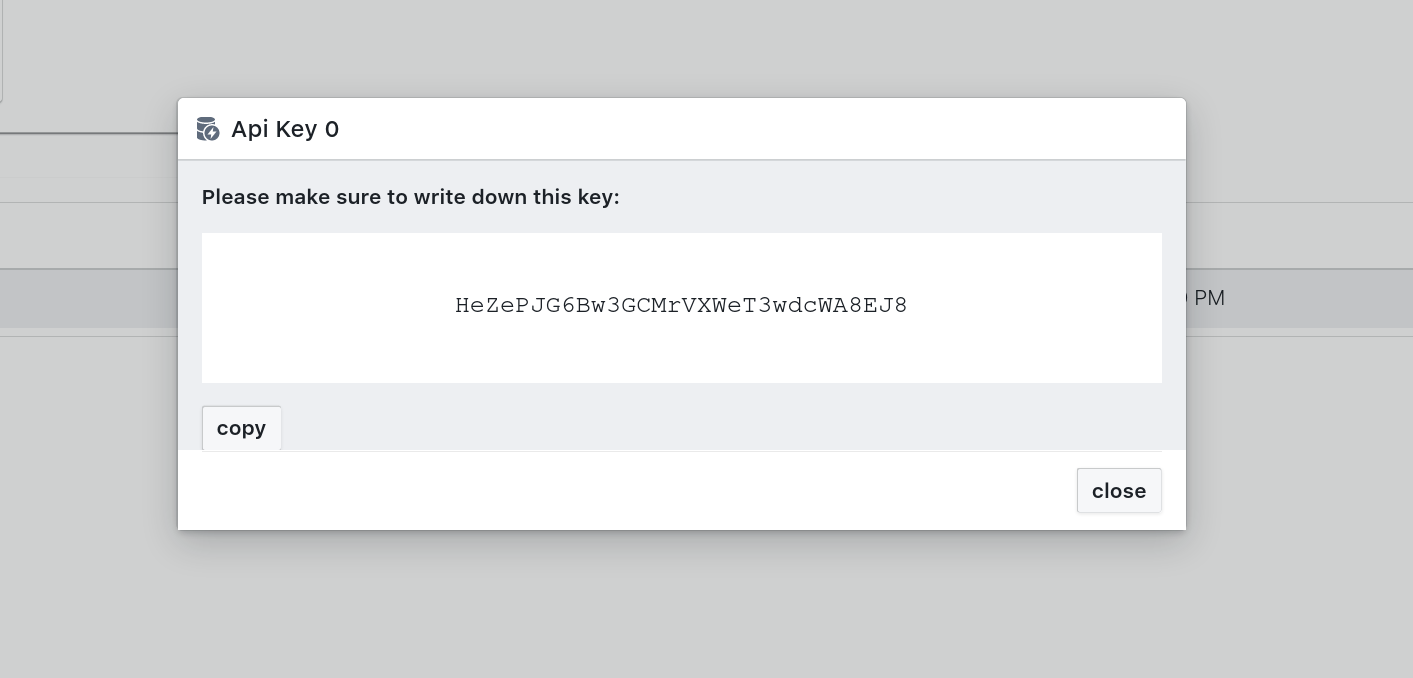
Always store your API keys in a safe place. Everyone with this key has access to all of your data that the key is assigned to.
We will see how to restrict access of a key in the next section.
Assign the API key to an application
Applications like Modules make use of API keys to allow for external access for applications that you have built with Tofu AI.
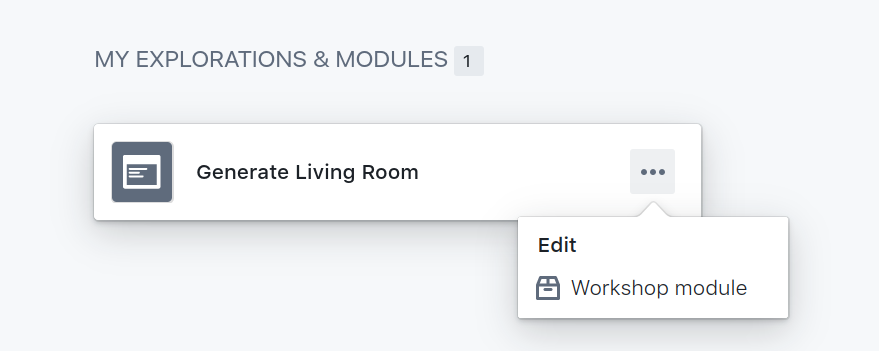
To grant access to a Module, head over to the Ontology section via the blue icon in the sidebar. Next find a module that you want to access via the API, hover the ... symbol and click Edit workshop module.
Find the Share button in the top right of the header bar and click it. The share options will intially be empty.
Select your previously created API key and hit Ok. Your module is now accessible via API and you do not need to re-submit the module and can exit the page without further interactions.
Read data using an API key
When sending request to our API (e.g. to Download a file), we expect you to send your API key via a HTTP header with the name x-tofu-api. If you ommit this header, or our API detects that the key does not have access to a ressource, it will reply with Auth failed.
a typical API header has 30 characters, is called x-tofu-api and usually looks like this:
x-tofu-api: iLH8mzBha50xpqywuzzcc8noqLI3Dl
The API endpoints depend on the URL that you access Tofu AI with. Check the following table to find out which endpoint to use:
| Tofu dashboard url in your browser | API Endpoint to use | API Version |
|---|---|---|
| https://ohmytofu.ai/app | https://db.ohmytofu.ai | 1 |
| https://developers.ohmytofu.ai | https://db-staging.ohmytofu.ai | 1 |
End to end example: Image to Image
Let's walk through an example application end to end. You'll be triggering a pipeline that generates virtually staged apartments from photos of empty apartments with the Image2Image function of the Tofu SDK.
Install dependencies
You need to have Node.js installed on your local computer. The commands displayed here have been tested in Linux, but should work equally or similar on Windows & MacOS.
Create a new npm project:
npm init
To connect to the Tofu AI APIs, you will need a GraphQL client. A well supported client is Apollo. Node.js Applications that use Apollo Client require two top-level dependencies:
@apollo/client: the client that speaks to our API.graphql: This package provides logic for parsing GraphQL queries.
We will also install node-fetch and cross-fetch to support older nodeJS versions in making network calls and graphql-ws to connect to websockets
Run the following command to install all of the required packages:
npm install --save @apollo/client graphql graphql-ws websocket node-fetch@2 cross-fetch
Overview
We'll be using 3 concepts of graphQL:
- Mutations to trigger a pipeline job
- Subscriptions to listen for the status of a) the pipeline job (cycles through
BOOTING,HEALTHY,STOPPED) b) new results - Queries to fetch the newly generated image
Setup Client
Create a file called client.js that sets up the connection to our API. This file is shared and imported across all examples.
// graphQL client requirements
const { ApolloClient, InMemoryCache, HttpLink, gql } = require('@apollo/client')
// used to set auth headers
const { setContext } = require('@apollo/client/link/context')
// used to substitude missing native fetch in older nodeJS versions
const fetch = require('cross-fetch')


const authLink = setContext((_, { headers }) => {
  // get the authentication token from local storage if it exists
  // return the headers to the context so httpLink can read them
  return {
    headers: {
      ...headers,

      "x-tofu-api": process.env.API_KEY
    }
  }
});
const httpLink = new HttpLink({
  uri: process.env.HTTP_API,
  fetch
})
// construct client and cache
const cache = new InMemoryCache();
const client = new ApolloClient({
  // Provide required constructor fields
  link: authLink.concat(httpLink),
  cache,

  // Provide some optional constructor fields
  name: 'example-client-trigger',
  version: '0.1',
  queryDeduplication: false,
  defaultOptions: {
    watchQuery: {
      fetchPolicy: 'cache-and-network',
    },
  },
});

module.exports = client
Step 1: Trigger a pipeline
Create a new file in your working directory called trigger.js.
The following example code will be triggering a pipeline (AI job) that was previously constructed in the web interface. It takes an image as the first argument which is uploaded into your project and then returns a path to it. The pipeline is then invoked with the uploaded image path as the input.
// used to construct a graphQL string
const { gql } = require('@apollo/client')
// the graphQL client
const client = require('./client')
const fs = require('fs');
const Path = require('path')
const fetch = require('node-fetch')

// will hold the file you select
var fileToUpload;

const userSelectedFilePath = process.argv[2]

// check if the user provided a file
if (!!!userSelectedFilePath) {
  throw new Error("Please provide a file to upload by calling the script with a PNG file as the first argument: e.g. `node trigger.js /path/to/image.png`")
}

// load the file from disk
try {
  fileToUpload = fs.readFileSync(userSelectedFilePath);
} catch (err) {
  // something went wrong reading the file
  console.error(err);
}

// setup the  graphQL mutation strings
const GENERATE_IMAGE_UPLOAD_URL = gql`
  mutation($files: [Upload!]!){
    uploadTmpFiles(files: $files)
  }
`;

const TRIGGER_PIPELINE = gql`
  mutation ($triggerId: ID!, $workshopModuleId: ID, $settings: DataFieldForTriggerInput ) {
    triggerPipeline(triggerID: $triggerId, workshopModuleID: $workshopModuleId, settings: $settings)
  }
`;

const uploadFile = async (file, presignedUrl) => {
  // upload the file to the presigned URL we received earlier
  return await fetch(presignedUrl, {
    method: 'PUT',
    body: fileToUpload,
  })
    .then((res) => {
      // the file path is referenced as the input to the AI prediction pipeline (triggerPipeline)
      let filePath = new URL(res.url)
      return filePath
    })
    .catch((error) => {
      console.error(error)
    })
}

const uploadFileAndTrigger = async () => {
  // setup variables containing the file to upload to your project
  const uploadVariables = {
    files: {
      path: Path.basename(userSelectedFilePath) // the filename under which the file will be uploaded in the next step, if the path is /my/folder/image.png, the path value is image.png
    }
  }
  // execute the uploadFile mutation to get the `presignedUrl`
  const maybePresignedUrl = await client.mutate({
    mutation: GENERATE_IMAGE_UPLOAD_URL,
    variables: uploadVariables
  })

  // read the response that graphQL provided
  let presignedObjects = maybePresignedUrl ?.data ?.uploadTmpFiles
  // should have one url inside of it after we requested a URL for one file
  if (presignedObjects.length === 0) throw new Error("something went wrong getting the upload url for your file")

  // now that we have a presigned url we can upload the file to it
  let maybeUploadedFileInfo = await uploadFile(
    fileToUpload, // raw file
    presignedObjects ?.[0] ?.presignedUrl // the url generated for the upload
  )
  // we should have a href value
  if (!!!maybeUploadedFileInfo ?.href) throw new Error("something went wrong uploading your file.")

  // the path within s3 that points to the file you just uploaded
  let uploadedFilePath = maybeUploadedFileInfo ?.href

  // setup our variables
  const triggerVariables = {
    triggerId: process.env.TRIGGER,
    workshopModuleId: process.env.WORKSHOP_MODULE,
    settings: {
      name: "input",
      value: uploadedFilePath,
      dataType: "String"
    }
  }
  // execute the trigger that runs the AI prediction on the image
  const results = await client.mutate({
    mutation: TRIGGER_PIPELINE,
    variables: triggerVariables
  })

  console.log({ results }) // should contain `triggerPipeline: true`
}


// execute the async code (nodeJS does not support top level await calls)
uploadFileAndTrigger()
Before executing this code continue with the next section.
Step 2: Listen for status updates & retrieve results
Create a file pods.js in your local nodeJS project.
The following example code will listen for status updates of the pipeline you will trigger with the code from Step 1.
Executing code within pipelines within Tofu AI is tracked and billed via pods. Once you trigger any pipeline a pod will start, provision itself with the work to be executed and write back results.
The example code listens for pods events that cycle through the states BOOTING,HEALTHY,STOPPED, and will be printed out with their timestamps. This can serve as the status of the pipeline to your own application logic. Updates are received in real time.
A second real time listener will listen for updated data (pipelines usually update data in the dataset of your project). Whenever the signal for an update on data is received, the data is fetched and printed to the console.
const { GraphQLWsLink } = require('@apollo/client/link/subscriptions')
const { ApolloClient, InMemoryCache, gql } = require('@apollo/client')
const { createClient } = require('graphql-ws')
const WebSocket = require('ws')
const httpClient = require('./client')

const wsLink = new GraphQLWsLink(createClient({
  url: process.env.WS_API,
  webSocketImpl: WebSocket
}));

const wsClient = new ApolloClient({
  link: wsLink,
  cache: new InMemoryCache()
})

// receive pod updates
const PODS_SUBSCRIPTION = gql`
  subscription Pods($userId: ID!) {
    pod(userId: $userId) {
      id
      status
      createdAt
      startedAt
      stoppedAt
      lastUpdatedAt
    }
  }
`;

// receive data updates
const LIVE_DATA_SUBSCRIPTION = gql`
  subscription($liveObjectViewId: ID!) {
    liveObjectView(id: $liveObjectViewId) {
      id
    }
  }
`
// query data
const OBJECT_VIEW = gql`
  query OBJVIEW($objectTypeId: ID, $workshopModuleId: ID) {
    objectView(objectTypeID: $objectTypeId, workshopModuleID: $workshopModuleId) {
      dataFrame
    }
  }
`

const podSubscription = wsClient.subscribe({
  query: PODS_SUBSCRIPTION,
  variables: {
    userId: process.env.USER_UID
  }
})

const liveDataSubscription = wsClient.subscribe({
  query: LIVE_DATA_SUBSCRIPTION,
  variables: {
    "liveObjectViewId": process.env.OBJECT
  }
})

/**
#### Pod subscriptions ####
Displays a live view of pods via graphql subscriptions. A pod is one execution of a pipeline that is triggered via the UI or a API call.
**/
podSubscription.subscribe({
  next({ data }) {
    // Prints updates on pods (AI jobs being run) in this form:
    // {
    //   podDataReceived: {
    //     id: '6fd78d04-ef50-45d4-ac56-bd550f56d116',
    //     status: 'BOOTING',
    //     createdAt: '2023-05-02T08:54:49.328Z',
    //     startedAt: null,
    //     stoppedAt: null,
    //     lastUpdatedAt: '2023-05-02T08:54:49.328Z',
    //     __typename: 'Pod'
    //   }
    // }
    // [2 min later...]
    // {
    //   podDataReceived: {
    //     id: '6fd78d04-ef50-45d4-ac56-bd550f56d116',
    //     status: 'HEALTHY',
    //     createdAt: '2023-05-02T08:54:49.328Z',
    //     startedAt: null,
    //     stoppedAt: null,
    //     lastUpdatedAt: '2023-05-02T08:56:49.885Z',
    //     __typename: 'Pod'
    //   }
    // }
    console.log({ podDataReceived: data.pod })
  },
  error(err) {
    console.log({ err })
  }
})

/***
#### Pod subscriptions ####
Whenever a pod has finished running it informs us that we can re- fetch the data
**/
liveDataSubscription.subscribe({
  async next({ data }) {
    // we received the signal that the data has updated
    console.log({ data })

    // we should find an ID to the object that has been updated
    let maybeUpdatedObjectID = data ?.liveObjectView ?.id
    if (!!!maybeUpdatedObjectID) throw new Error("something went wrong, could not find an ID")

    console.log({ maybeUpdatedObjectID })

    // re fetch the data
    const { data: dataObjectView } = await httpClient.query({
      query: OBJECT_VIEW,
      variables: {
        "objectTypeId": maybeUpdatedObjectID,
      }
    })

    // the dataframe is the data view of our object and contains our results
    let dataFrame = dataObjectView.objectView.dataFrame
    console.dir({ dataFrame }, { depth: null }) // should have keys 'topic', 'time_created', 'images', 'title'

  },
  error(err) {
    console.log({ err })
  }
})
Step 3: Run the code
After you have created the files trigger.js and pods.js as described above, open two terminal windows inside your working directory.
It's best to run the code in reverse order, to not miss any status updates as soon as triggering a pipeline run.
Terminal 1: Listen for status updates
In the first terminal run the following code to execute Step 2.
❯ WS_API=wss://your-api-endpoint.omhytofu.ai/ws \
  HTTP_API=https://your-api-endpoint.ohmytofu.ai \
  API_KEY=your-workshop-module-api-key \
  USER_UID=your-user-id \
  OBJECT=your-data-object-id \
  node pods.js
Terminal 2: Trigger the pipeline
In the second terminal run the following code to execute Step 1.. Make sure to provide the local filesystem path to a PNG image to pass along as the input to the pipeline.
❯ HTTP_API=https://your-api-endpoint.ohmytofu.ai \
  API_KEY=your-workshop-module-api-key \
  TRIGGER=your-pipeline-trigger-id \
  WORKSHOP_MODULE=your-workshop-module-id \
  node trigger.js /path/to/input-image.png
Download images
The result of Step 3 is a dataframe. This structure contains the array images, which itself contains the path(s) to the image(s) the pipeline generated.
An exemplary dataframe might look like this:
  dataFrame: [
    {
      topic: 'Generated image',
      time_created: '2023-05-04T08:13:27.791Z',
      images: [
        [
          true,
          'genimgcache/c0ec55sf-2kx9-xl1l-912n-ff1k7132y3r1.png'
        ]
      ],
      title: 'https://s3.ohmytofu.ai/dev-tmp-uploads/uploads/[...]'
    },
    ...
where images has typically one to many entries (paths to images) depending on how many images you generate per user input.
The following example code downloads the image to your local filesystem. Downloading an image is a similar procedure as uploading an image. You first request a public, time limited and secret link and then point your code to download the file from that link.
First, create a folder outputs by running
mkdir outputs
Next, create a file downloadImages.js and paste in the following code.
// used to construct a graphQL string
const { gql } = require('@apollo/client')
// the graphQL client
const client = require('./client')
const fs = require('fs');
const Path = require('path')
const fetch = require('node-fetch')

const { Readable } = require('stream');
const { finished, pipeline } = require('stream/promises');


const userSelectedS3Path = process.argv[2]

// check if the user provided a s3 path
if (!!!userSelectedS3Path) {
  throw new Error("Please provide a path to the image that you want to download by calling the script with a s3 path as the first argument: e.g. `node downloadImage.js genimgcache/c0ec55sf-2kx9-xl1l-912n-ff1k7132y3r1.png`")
}
// creates a public, time limited secret link to download a file once executed
const GENERATE_IMAGE_DOWNLOAD_URL = gql`
  mutation downloadFiles($files: [FileToDownload!]!, $fromPath: Boolean) {
    downloadFiles(files: $files, fromPath: $fromPath)
  }
`;

const downloadFile = async (pathToFile) => {
  const downloadVariables = {
    files: [pathToFile], fromPath: true
  }
  // execute the downloadFile mutation to get the `presignedUrl`
  const maybePresignedUrl = await client.mutate({
    mutation: GENERATE_IMAGE_DOWNLOAD_URL,
    variables: downloadVariables
  })
  console.dir({ maybePresignedUrl }, { depth: null })
  // read the response that graphQL provided
  let presignedObjects = maybePresignedUrl ?.data ?.downloadFiles

  // get the filename from the s3 path
  let filename = Path.basename(pathToFile)
  // the file should be saved in the outputs directory with the filename
  const stream = fs.createWriteStream(`outputs/${filename}`)
  // fetch the file
  const { body } = await fetch(presignedObjects[0])
  // write it to disk
  await pipeline(
    body,
    stream,
  )

}

// execute the async code (nodeJS does not support top level await calls)
downloadFile(userSelectedS3Path)
Execute the code by running:
❯ HTTP_API=https://your-api-endpoint.ohmytofu.ai \
  API_KEY=your-workshop-module-api-key \
  node downloadImage.js your-image-path-from-step-3.png
You should now find the downloaded image in your local outputs folder.
If you have questions or face issues following along this tutorial, please reach out to support@ohmytofu.ai